Showing posts with label recipe. Show all posts

Saturday, August 27

Cookies & cream cupcakes


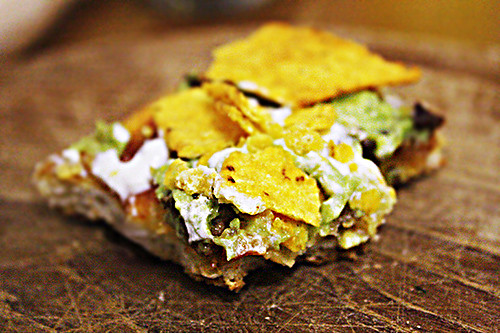
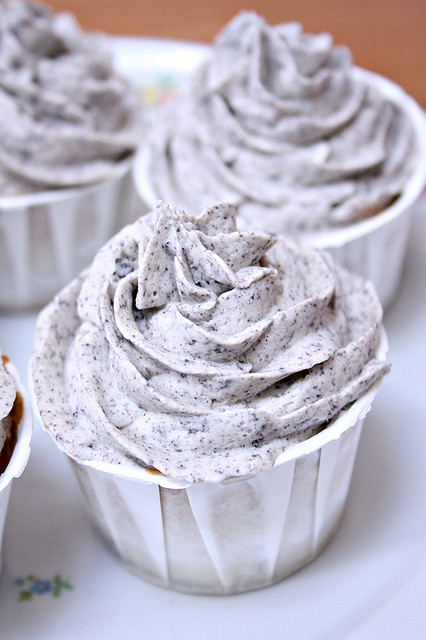
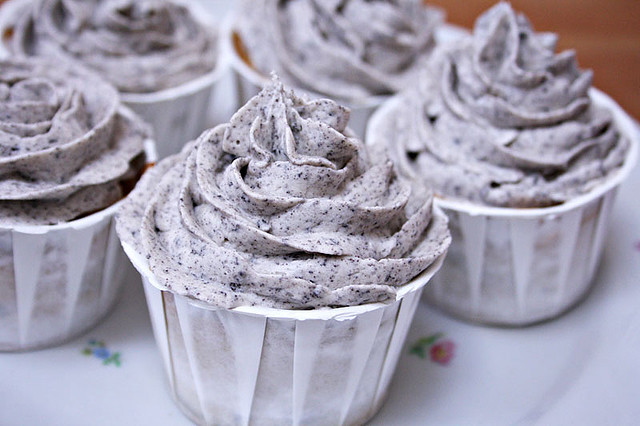
I have been wanting to make cupcakes in a while now. And what is better than some great Cookies & Cream cupcakes? The icing is super sweet but it combines very well with the oreo pieces in it. Also the oreo placed on the bottom of the cupcakes stays very crunchy, which I love in a cupcake.


Cookies & Cream Cupcakes
Yield: 24 cupcakes
Ingredients
For the cupcakes:
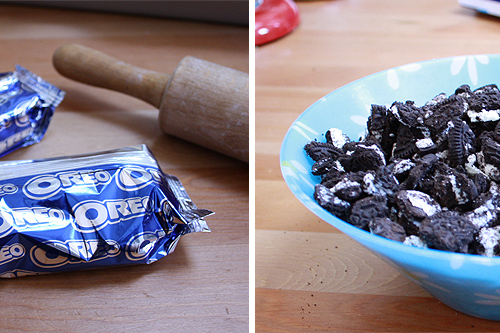
24 Oreo halves, with cream filling attached
2¼ cups (142gram) all-purpose flour
1 tsp. baking powder
½ tsp. salt
8 tbsp. (115gram) unsalted butter, at room temperature
1 2/3 cup (375gram) sugar
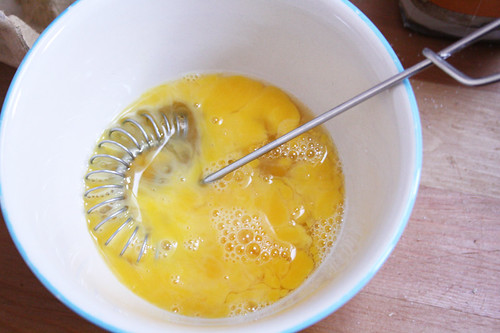
3 large egg whites, at room temperature
2 tsp. vanilla extract
1 cup (235ml)milk
20 Oreo cookies, coarsely chopped
Method
Preheat the oven to 350˚ F (150C).  
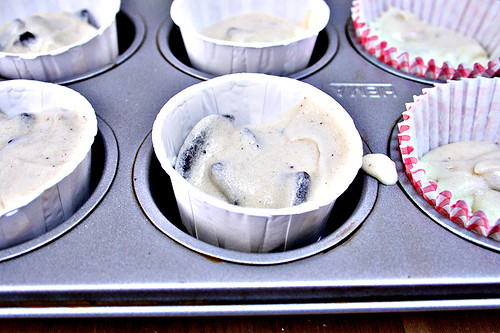
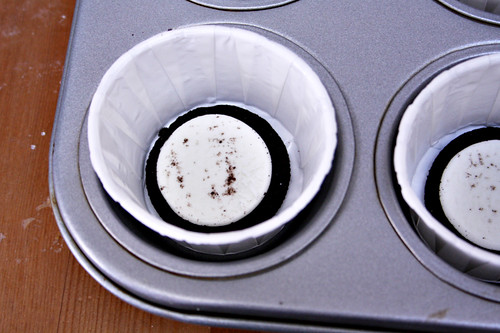
Line the wells of two cupcake pans with 24 paper liners.  Place an Oreo halve in the bottom of each liner, cream side up.  
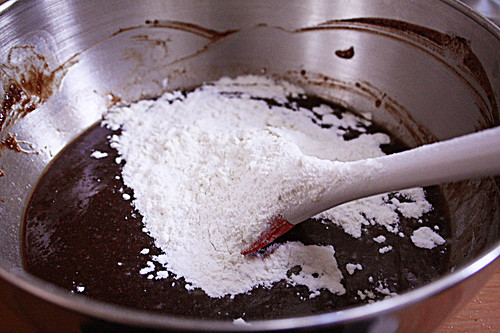
In a medium bowl, combine the flour, baking powder and salt; stir together with a fork to blend and set aside. 
In the bowl of an electric mixer, combine the butter and sugar and beat together on medium-high speed until light and fluffy, about 2 minutes.  Blend in the egg whites one at a time, beating well after each addition.  Blend in the vanilla extract.  With the mixer on low speed, beat in half of the dry ingredients just until incorporated.  
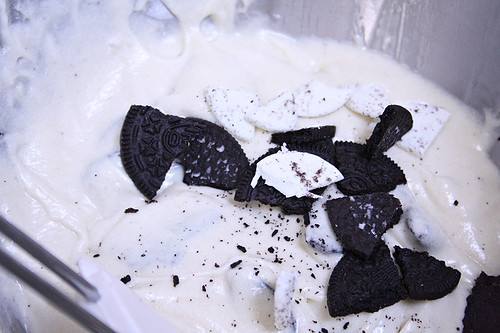
Add the milk and beat just until combined, then mix in the remaining dry ingredients.  Gently fold in the chopped Oreos with a rubber spatula until evenly incorporated, being careful not to over-mix.
Evenly divide the batter between the prepared cupcake liners.  Bake for 18-20 minutes, rotating the pans halfway through baking, until a toothpick inserted in the center comes out clean.  Allow to cool in the pans 5-10 minutes, then transfer to a wire rack to cool completely.
Adapted from Annies Eats

Cookies & Cream frosting
Yield: 12 cupcakes (!!)
Ingredients
2/3 cup (150 grams) unsalted butter at room temperature 
2 1/3 cups (300 grams) powdered sugar, sifted 
2 tbsp whipping cream 
1 tsp pure vanilla extract 
1 heaping tbsp Oreo cookie crumbs
 (I used more)

Method
In bowl of a stand mixer, fitted with paddle attachment. 
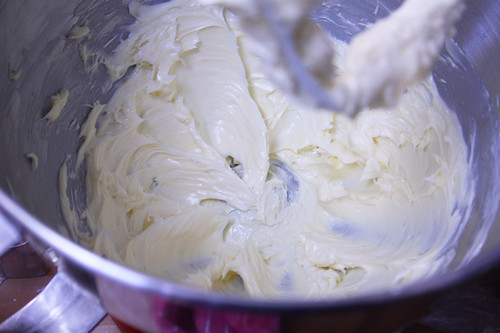
Beat butter until very soft and fluffy - approx. 4 minutes on high speed.
Add sifted powdered sugar. 
Beat on slow speed until mixture starts to combine then increase to medium speed for 1 minute
.
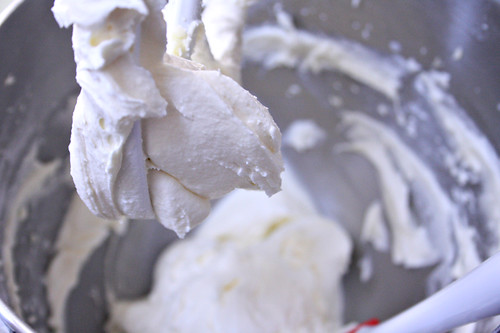
Then increase speed to to and beat for another 5 minutes .
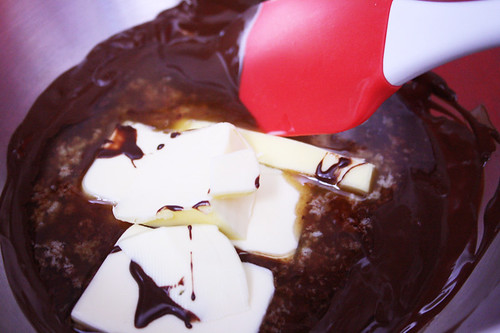
Scrape down sides of bowl. Add heavy crean, vanilla extract and cookie crumbs. 
Beat 2 minutes on medium speed.
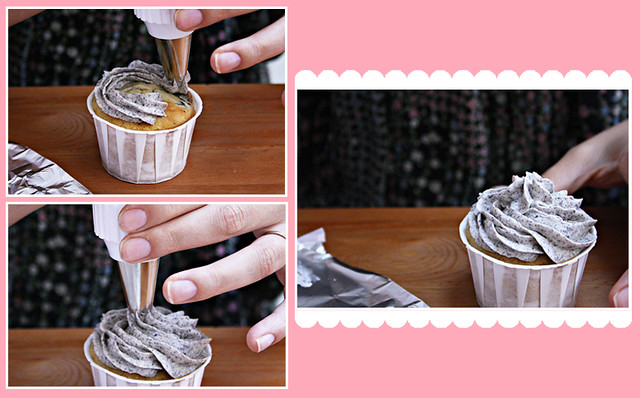
Pipe into the cupcakes, top with an oreo cookie if wanted. 
Adapted from Lemon Drop

VoilĂ ! The result! Delicous and so so very sweet!

Wednesday, July 13

Taco Pizza


Mexican food is one of my favorite types of food. Guacamole, sour cream, nacho's, melted cheese, salsa sauce... need I say more? One of my favorite dishes is enchiladas, with homemade enchilada sauce, homemade guacamole and also topped with a big portion of sour cream. Yes I am drooling right now. And yes, this has a lot of calories (that's why I don't eat it much, but when I do eat it, I eat it goood.)

I found this video on YouTube the other day, and then I found this video as well. And well, the taco pizza was made! And let me tell you, it was de-licious! (for the recipe, check the second video out)

Taco Pizza
Ingredients
I have no exact measurements for this recipe, because you can make it exactly like you want it. And that's the fun of it! Also the directions speak for themselves, but I mention it anyways.
Storebought pizza dough
1 can Tomato sauce
1 tsp Mexican spice mix (like taco mix or something else you like)
Cheese
Guacamole
Sour cream
Natural nacho's
Olives
Other vegetables for topping

Method
1. Preheat oven as instructed on the dough package. Rollout your pizzadough. Mix the spiceswith the tomato sauce (this is ofcourse optional, but I like this spicy) and spread it over the dough.
2. Add your cheese, olives and other vegetables.
3. Bake as said on the packaging.
4. When baked, put guacamole, sourcream and nacho's on top and cut in pieces.

Enjoy!

Sunday, July 3

Katharine Hepburn's brownies


 I have been searching for a good brownie recipe quite some while, and have been through about a dozen recipes. This was the last one I tried out, and it's a keeper! I have been making it ever since for special occasions. It's a fudge-type brownie, which is my favorite.
It's probably one of the easiest recipes out there, so perfect for those busy days where you have to bake something fast.


All of the ingredients, except the chocolate, vanilla extract and salt.

1. Preheat oven to 325 degrees F (165 degrees C) and place rack in center of oven.


2. Butter and flour an 8 inch (20 cm) square baking pan. Melt the chocolate and butter in a stainless steel bowl placed over a saucepan of simmering water.

Whisk the eggs

3. Remove from heat and stir in the sugar. Next, stir in the vanilla extract and eggs.

4. Finally, stir in the flour, salt and chopped nuts. I didn't have any nuts when making it this time, but I REALLY recommend adding some pecans! Pour into the prepared pan and bake for about 30 - 35 minutes, or until a toothpick inserted in the center comes out clean. Remove from oven and let cool on a wire rack. Serve at room temperature or chilled. These freeze very well.
 Makes 16 brownies.


I cut mine into squares and put them in this cute tin. Cute and yummy!


Katharine Hepburns Brownies
Ingredients
2 ounces (60 grams) unsweetened chocolate, coarsely chopped
1/2 cup (113 grams) unsaltedbutter, cut into pieces
1 cup (200 grams) granulated whitesugar
2 largeeggs
1/2 teaspoon purevanillaextract
1/4 cup (30 grams) all-purposeflour
1/4 teaspoon salt
1 cup (100 grams) chopped walnuts or pecans (optional)

Method
1. Preheat oven to 325 degrees F (165 degrees C) and place rack in center of oven. 
2. Butter and flour an 8 inch (20 cm) square baking pan. Melt the chocolate and butter in a stainless steel bowl placed over a saucepan of simmering water.
3. Remove from heat and stir in the sugar. Next, stir in the vanilla extract and eggs. 
4. Finally, stir in the flour, salt and chopped nuts. I didn't have any nuts when making it this time, but I really recommend adding some pecans! Pour into the prepared pan and bake for about 30 - 35 minutes, or until a toothpick inserted in the center comes out clean. Remove from oven and let cool on a wire rack. Serve at room temperature or chilled. These freeze very well. 
 Makes 16 brownies.

Adapted from Joy of baking

Thursday, June 30

Strawberry tart


Summer is comming! And for me that means fruit tarts! One of my favorites is this strawberry tart. I have made it several times for birthdays, and made it for my colleages from my internship. And so far, it has been a great succes!
My favorite part is the crust. It's made of pecans, my favorite nut type. The filling is made of creamcheese and white chocolate, and to make it summery, I added some lemon juice. 

Crust
  • 3/4 cup Pecans
  • 1/4 cup (32g) sugar
  • 1 1/2 cup flour
  • 1/2cup (113gr) butter, in pieces
  • 1 eggyolk

1. Preheat the oven at 170C (338F). Grind the pecans in a food processor. My experience is that the pecans don't really 'grind', but they consist of bits of pieces. Thats no problem, I actually quite like it. Yumm!
2. Mix the butter, sugar and flour together. I do this with the Kitchen Aid, but use what you like. Then add the pecans.
3. Add the eggyolk and combine throuhly untill it forms a ball of dough. It's not supposed to be a firm dough, like a cookie dough. It's more like a floury dough.
 (is that even correct english, haha)
4.This dough is hard to roll out. What I do is I take pieces from the dough and press them into the pan, untill it forms a whole crust. Make sure you spread the dough evenly, so that there are no tiny holes.
5. Place a piece of baking papier over the crust, then spread baking beans over it.  Bake in the oven for about 15-17 minutes with the baking paper over it. After, remove the baking paper and baking beans and bake for another 10 minutes. At the end the ends should be brown and crispy.
Let it cool down.


Filling
  • 80gr white chocolate
  • 300gr creamcheese
  • 1/2 cup (100g) white sugar
  • 1 teaspoon vanilla sugar
  • Strawberries
1. Mix in a bowl or a food processor the cream cheese, sugar, vanilla sugar until its a fluffy'-like mixture
2. Melt the white chocolate a bain marie. Then you can spread the chocolate over the crust, or mix it with the entire filling.  Sometimes I like spreading it over the crust, and let it cool down and get hard. This gives an extra firm and crispness to the tart. If you mix it with the filling, let it cool down a little before you do so.

3. Spread the mixture over the crust. Remove the crowns of your strawberries and cut into slices. Place them on the cake, and voila!

I let the cake still half an hour in the refrigerator before I cut it.
I promise you will not regret having the tart, perfect for spring or summer!

Tuesday, December 28

Oreo fudge bars


We all love Oreo cookies! When I found this recipe I had HAD to try it out. And the results were amazing. The centre is super soft and chewy, but the outside is very crisp. The perfect combo right?
I save these bars in the freezer, then eat them after about 10 minutes. Keeping them at room temperature isn't really possible, the fudge becomes too soft then and it becomes hard to eat. But if you don't mind, then prepare for some dirty fingers!


Who can resist that?

·  1 16oz. package (500gr) Oreo cookies
·  1/2 cup (113gr) boter, melted
·  1/4 tsp salt
·  1 can  (400gr) sweetened condensed mik
·  1 tsp vanilla extract
·  3/4cup  (110gr)  semi-sweet chocolate chips
·  1 cup  (150gr) milk chocolate chips
·  1 cup  (150gr) white chocolate chips, gesmolten


Preheat the oven to 325 degrees F (165 degrees C)
Set aside 6 cookies and grind the rest in a food processor or blender. Or just crush them with a rolling pin like I did. Add the salt.

In a small bowl, stir together the cookie crumbs and butter until well blended. Press into the bottom of an 11x13 inch pan.


Over a double boiler or in the microwave, melt 1 cup of chocolate chips together with the condensed milk and vanilla. Stir frequently until smooth. Spread evenly over the crumb crust. Sprinkle the remaining chocolate
chips over the top. Break remaining cookies into pieces by hand and sprinkle over the top.

Bake for 20 to 25 minutes in the preheated oven. Chill completely (for about 1 hour) before cutting into bars.
Melt the white chocolate chips and drizzle them over the bars with a fork.


Enjoy tis sugarbomb! <3
Recipe adapted from Bakingblonde

Thursday, November 11

Chorizo buns


I have lived in Spain for eight years, and chorizo is something that I miss so much now that I live in Holland. I love that it is so spicy with this unique intense flavor, which I miss in a lot of other ''sausage types'. If you are not the spicy type, you can buy a milder type in the supermarket. How great is that?
When I went to Spain this summer, to visit the town where I grew up my boyfriend fell in love with it as well, and he's been eating it ever since. So when I stumbled upon this recipe from Kayotic Kitchen I didn't hesitate, I bought my things and made some delicious little chorizo buns. 
I really recommend checking out her site, her blog is amazing and almost all of her posts take you through all the steps in the recipes with great photography. Besides, she's dutch as well so that's pretty cool.


From Kayotic Kitchen

  • 3 heaping tbsp garlic/herb cream cheese
  • 6 puff pastry sheets (frozen)
  • 1/2 cup cheese, grated
  • roughly 4oz chorizo
  • 1/2 red bell pepper
  • 1/2 tsp dried basil
  • 1 small red onion
  • paprika powder
  • pepper
  • 1 egg
  1. Start by chopping the onion and bell pepper, chop as finely as you can or use your food processor. You can use about 4oz Spanish chorizo, or about half of a sausage.
  2. Use a little oil and sautee the onion and bell pepper until your onion is translucent. Put the chorizo in a big bowl and add your grated cheese.
  3. Now add 3 heaping tbsp spiked cream cheese. Plunge in your vegetable mix and also add 1/2 to 1 tsp dried basil. Add a good pinch of black pepper, grab a fork and start mixing it all up. Taste to see if it needs more of anything. Usually it’s perfect like this.
  4. Sprinkle a little flour on your cutting board or kitchen counter. Place the pastry sheets next to each other and sprinkle a little flour on top as well.
  5. Now break out your dough pin – if you’re anything like me it’s probably somewhere in the back of a drawer with the other stuff you seldom use anymore. Great to have around for these occasions, though. Start rolling out the puff pastry a bit. No need to make it paper thin, just a little thinner. ( didn't do this, I like it better when the dough is a little thicker. 
  6. With a cookie cutter (about 3 inch wide) or a glass cut out little pastry circles. Get the leftovers and knead it.
  7. Sprinkle a little flour underneath the dough and roll it out again. Using your cookie cutter or glass or whatever, continue making pastry circles.
  8. Start filling the pastry. Use 1/2 to 1 tsp filling on one half, fold the other half over and seal the edges. If the edges won’t stick as much as it did before rolling out the dough for the 2d (3d or 4th) time, just get your fingers wet and lightly dab some water on the inside of the pastry, that will make it sticky again.
  9. When you’re done, place them on a cookie sheet. Get a little paprika powder on top of them. Just hold your measuring spoon over a small sieve (it’s called a sieve, right?) and lightly tap your finger on the side of the spoon. This will distribute the paprika powder more evenly. (I just mixed the paprika powder with the egg in a little bowl and then brushed it over the puffs)
  10. Preheat your oven to 450F (225C) and bake them for 12 to 15 minutes until beautifully brown and puffy.


Monday, November 1

Halloween cookies

I love Halloween! I find it a shame that it's not really that populair in the Netherlands (even tough I saw some kids trick or treating this year). I love all the kinds of candy you can make for halloween, specially with all the spooky decorations. I found it a good excuse to finally start cookie decorating, since I bought stuff to do that. So here, my first time cookie decorating! I'm so proud!


I hate it when I have to use flash, but I want to show my ghost cookie!

All recipes adapted from: Joy of Baking
Sugar Cookies:

  • 3 cups (390 grams) flour
  • 1/2 teaspoon salt
  • 1 teaspoon baking powder
  • 1 cup (227 grams) unsalted butter, room temperature
  • 1 cup (200 grams) Sugar
  • 2 large eggs
  • 2 teaspoons vanilla extract
Royal Icing
  • 4 cups (440 grams) confectioners' (powdered or icing) sugar, sifted
  •  3 tablespoons (30 grams) meringue powder
  • 1/2 teaspoon almond extract(optional)
  • 1/2 cup - 3/4 cup (120 - 180 ml)  warm water
  •  Food Coloring(I use Gel Pastes that can be found at cake decorating and party stores or else on-line
For Sugar Cookies: 
  1. In a separate bowl whisk together the flour, salt, and baking soda. In the bowl of your electric mixer (or with a hand mixer), beat the butter and sugar until light and fluffy (about 3 to 4 minutes). Add the eggs and vanilla extract and beat until combined. Add the flour mixture and beat until you have a smooth dough.
  2. Divide the dough in half and wrap each half in plastic wrap. Refrigerate for about one hour or until firm enough to roll.
  3. Preheat oven to 350 degrees F (177 degrees C) and place rack in center of oven. Line two baking sheets with parchment paper
  4. Remove one half of the chilled dough from the refrigerator and, on a lightly floured surface, roll out the dough to a thickness of 1/4 inch (1 cm).Remove one half of the chilled dough from the refrigerator and, on a lightly floured surface, roll out the dough to a thickness of 1/4 inch (1 cm). (Keep turning the dough as you roll, making sure the dough does not stick to the counter.) Cut out desired shapes using a lightly floured cookie cutter and transfer cookies to the prepared baking sheet. Place the baking sheets with the unbaked cookies in the refrigerator for 10 to 15 minutes to chill the dough which prevents the cookies from spreading and losing their shape while baking.
    Note: If you are not going to frost the baked cookies, you may want to sprinkle the unbaked cookies with crystal or sparkling sugar.
  5. Bake cookies for about 8-10 minutes (depending on size) or until the edges are just starting to brown. Remove from oven and let cookies cool on baking sheet for a few minutes before transferring to a wire rack to finish cooling. Frost with royal icing, if desired. Be sure to let the royal icing dry completely before storing. (This may take several hours.)
  6. Frosted cookies will keep several days in an airtight container. Store between layers of parchment paper or wax paper.
  7. Makes about 36 - 4 inch (10 cm) cookies.


For Royal Icing:

  1. In the bowl of your electric mixer (or with a hand mixer), beat the confectioners' sugar and meringue powder until combined. 
  2. Add the water and beat on medium to high speed until very glossy and stiff peaks form (5 to 7 minutes). If necessary, to get the right consistency, add more powdered sugar or water. 
  3. To cover or 'flood' the entire surface of the cookie with icing, the proper consistency is when you lift the beater, the ribbon of icing that falls back into the bowl remains on the surface of the icing for a few seconds before disappearing.

The icing needs to be used immediately or transferred to an airtight container as royal icing hardens when exposed to air. Cover with plastic wrap when not in use.

Sunday, October 10

Chocolate chip cookies


These are the best chocolate chip cookies ever! The edges of these cookies get a little crunchy and golden, and the middle stays quite chewy but hard.
The original recipe is only uses semisweet chocolate chips, but I made half white chocolate and half semisweet.


170gr (3/4 cup) unsalted butter, melted
220gr (1 cup) packed brown sugar
100gr (1/2 cup) white sugar
220gr (2 cups) all-purpose flour
1 egg
1 egg yolk
1/2 teaspoon baking soda
1/2 teaspoon salt
1 tablespoon vanilla extract
150gr (1 cup) semisweet chocolate chips
150gr (1 cup) white chocolate chips
  1. Sift together the flour, baking soda and salt; set aside.
  2. In a medium bowl, cream together the melted butter, brown sugar and white sugar until well blended. Beat in the vanilla, egg, and egg yolk until light and creamy. Mix in the sifted ingredients until just blended. Stir in the chocolate chips by hand using a wooden spoon.
  3. Refrigerate the dough for at least an hour. When it's time, Preheat the oven to 325 degrees F (165 degrees C). (Sometimes when I'm lazy I just chill them for about 15 minutes in the freezer)
  4. Drop cookie dough 1/4 cup at a time onto the prepared cookie sheets. Cookies should be about 3 inches apart.
  5. Bake for 15 to 17 minutes in the preheated oven, or until the edges are lightly toasted. Cool on baking sheets for a few minutes before transferring to wire racks to cool completely.

Adapted from Lovin' From the Oven

Friday, October 1

Harmony Coffee


At school I usually drink ''Harmony Coffee'', which basically is a cappuccino with white chocolate. They rasp white chocolate bars and dissolve it with the milk. I love it so much I decided to make it myself.


  • Your coffee (either a latte, cappuccino or even black)
  • 3 teaspoon white chocolate (or to taste)
  1. When you are making your coffee, rasp your white chocolate or melt it au bain marie style. I prefer to rasp it since that dissolves better, and when melting white chocolate it usually get's hard again and you get chunks in your coffee. Or use melting chocolate.
  2. If you are making a latte, add the white chocolate when the milk is at it's highest temperature. When you are making black coffee, add it as soon as possible.
  3. Serve your coffee!

Delicious in a big mug in front of the telly on a rainy day.
The mug is from Blond Amsterdam