Tuesday, December 28

Oreo fudge bars


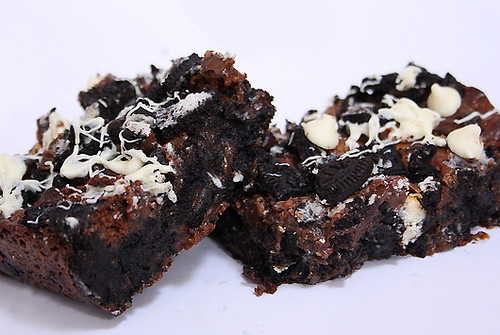
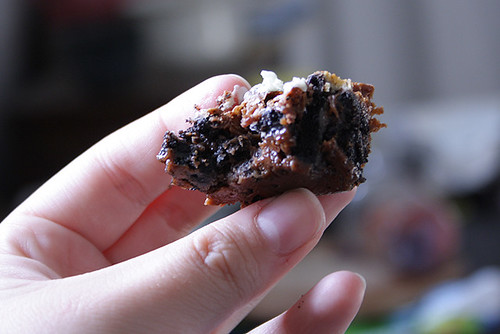
We all love Oreo cookies! When I found this recipe I had HAD to try it out. And the results were amazing. The centre is super soft and chewy, but the outside is very crisp. The perfect combo right?
I save these bars in the freezer, then eat them after about 10 minutes. Keeping them at room temperature isn't really possible, the fudge becomes too soft then and it becomes hard to eat. But if you don't mind, then prepare for some dirty fingers!


Who can resist that?

·  1 16oz. package (500gr) Oreo cookies
·  1/2 cup (113gr) boter, melted
·  1/4 tsp salt
·  1 can  (400gr) sweetened condensed mik
·  1 tsp vanilla extract
·  3/4cup  (110gr)  semi-sweet chocolate chips
·  1 cup  (150gr) milk chocolate chips
·  1 cup  (150gr) white chocolate chips, gesmolten


Preheat the oven to 325 degrees F (165 degrees C)
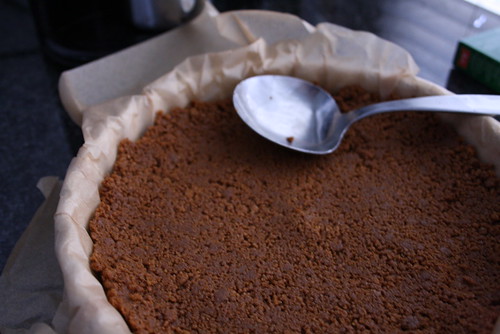
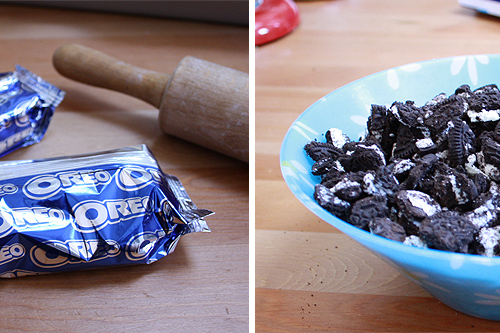
Set aside 6 cookies and grind the rest in a food processor or blender. Or just crush them with a rolling pin like I did. Add the salt.

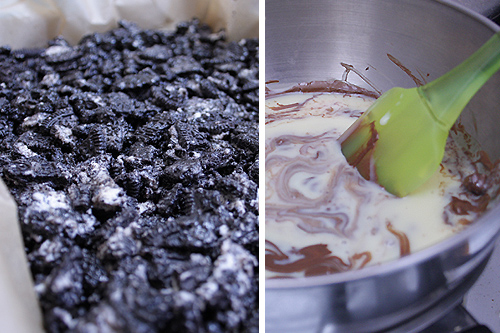
In a small bowl, stir together the cookie crumbs and butter until well blended. Press into the bottom of an 11x13 inch pan.


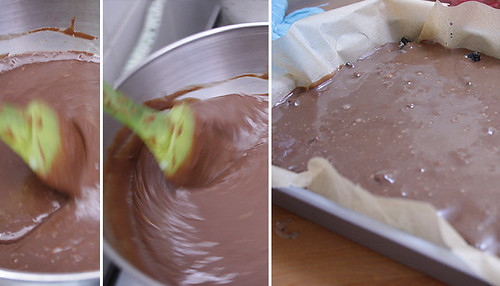
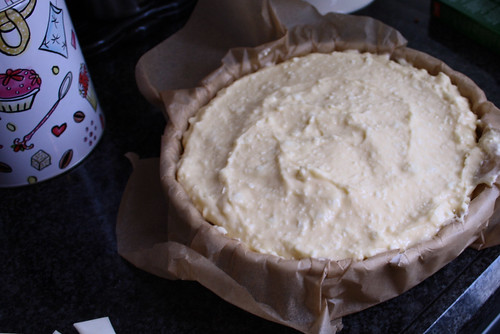
Over a double boiler or in the microwave, melt 1 cup of chocolate chips together with the condensed milk and vanilla. Stir frequently until smooth. Spread evenly over the crumb crust. Sprinkle the remaining chocolate
chips over the top. Break remaining cookies into pieces by hand and sprinkle over the top.

Bake for 20 to 25 minutes in the preheated oven. Chill completely (for about 1 hour) before cutting into bars.
Melt the white chocolate chips and drizzle them over the bars with a fork.


Enjoy tis sugarbomb! <3
Recipe adapted from Bakingblonde

Thursday, November 11

Chorizo buns


I have lived in Spain for eight years, and chorizo is something that I miss so much now that I live in Holland. I love that it is so spicy with this unique intense flavor, which I miss in a lot of other ''sausage types'. If you are not the spicy type, you can buy a milder type in the supermarket. How great is that?
When I went to Spain this summer, to visit the town where I grew up my boyfriend fell in love with it as well, and he's been eating it ever since. So when I stumbled upon this recipe from Kayotic Kitchen I didn't hesitate, I bought my things and made some delicious little chorizo buns. 
I really recommend checking out her site, her blog is amazing and almost all of her posts take you through all the steps in the recipes with great photography. Besides, she's dutch as well so that's pretty cool.


From Kayotic Kitchen

  • 3 heaping tbsp garlic/herb cream cheese
  • 6 puff pastry sheets (frozen)
  • 1/2 cup cheese, grated
  • roughly 4oz chorizo
  • 1/2 red bell pepper
  • 1/2 tsp dried basil
  • 1 small red onion
  • paprika powder
  • pepper
  • 1 egg
  1. Start by chopping the onion and bell pepper, chop as finely as you can or use your food processor. You can use about 4oz Spanish chorizo, or about half of a sausage.
  2. Use a little oil and sautee the onion and bell pepper until your onion is translucent. Put the chorizo in a big bowl and add your grated cheese.
  3. Now add 3 heaping tbsp spiked cream cheese. Plunge in your vegetable mix and also add 1/2 to 1 tsp dried basil. Add a good pinch of black pepper, grab a fork and start mixing it all up. Taste to see if it needs more of anything. Usually it’s perfect like this.
  4. Sprinkle a little flour on your cutting board or kitchen counter. Place the pastry sheets next to each other and sprinkle a little flour on top as well.
  5. Now break out your dough pin – if you’re anything like me it’s probably somewhere in the back of a drawer with the other stuff you seldom use anymore. Great to have around for these occasions, though. Start rolling out the puff pastry a bit. No need to make it paper thin, just a little thinner. ( didn't do this, I like it better when the dough is a little thicker. 
  6. With a cookie cutter (about 3 inch wide) or a glass cut out little pastry circles. Get the leftovers and knead it.
  7. Sprinkle a little flour underneath the dough and roll it out again. Using your cookie cutter or glass or whatever, continue making pastry circles.
  8. Start filling the pastry. Use 1/2 to 1 tsp filling on one half, fold the other half over and seal the edges. If the edges won’t stick as much as it did before rolling out the dough for the 2d (3d or 4th) time, just get your fingers wet and lightly dab some water on the inside of the pastry, that will make it sticky again.
  9. When you’re done, place them on a cookie sheet. Get a little paprika powder on top of them. Just hold your measuring spoon over a small sieve (it’s called a sieve, right?) and lightly tap your finger on the side of the spoon. This will distribute the paprika powder more evenly. (I just mixed the paprika powder with the egg in a little bowl and then brushed it over the puffs)
  10. Preheat your oven to 450F (225C) and bake them for 12 to 15 minutes until beautifully brown and puffy.


Monday, November 1

Halloween cookies

I love Halloween! I find it a shame that it's not really that populair in the Netherlands (even tough I saw some kids trick or treating this year). I love all the kinds of candy you can make for halloween, specially with all the spooky decorations. I found it a good excuse to finally start cookie decorating, since I bought stuff to do that. So here, my first time cookie decorating! I'm so proud!


I hate it when I have to use flash, but I want to show my ghost cookie!

All recipes adapted from: Joy of Baking
Sugar Cookies:

  • 3 cups (390 grams) flour
  • 1/2 teaspoon salt
  • 1 teaspoon baking powder
  • 1 cup (227 grams) unsalted butter, room temperature
  • 1 cup (200 grams) Sugar
  • 2 large eggs
  • 2 teaspoons vanilla extract
Royal Icing
  • 4 cups (440 grams) confectioners' (powdered or icing) sugar, sifted
  •  3 tablespoons (30 grams) meringue powder
  • 1/2 teaspoon almond extract(optional)
  • 1/2 cup - 3/4 cup (120 - 180 ml)  warm water
  •  Food Coloring(I use Gel Pastes that can be found at cake decorating and party stores or else on-line
For Sugar Cookies: 
  1. In a separate bowl whisk together the flour, salt, and baking soda. In the bowl of your electric mixer (or with a hand mixer), beat the butter and sugar until light and fluffy (about 3 to 4 minutes). Add the eggs and vanilla extract and beat until combined. Add the flour mixture and beat until you have a smooth dough.
  2. Divide the dough in half and wrap each half in plastic wrap. Refrigerate for about one hour or until firm enough to roll.
  3. Preheat oven to 350 degrees F (177 degrees C) and place rack in center of oven. Line two baking sheets with parchment paper
  4. Remove one half of the chilled dough from the refrigerator and, on a lightly floured surface, roll out the dough to a thickness of 1/4 inch (1 cm).Remove one half of the chilled dough from the refrigerator and, on a lightly floured surface, roll out the dough to a thickness of 1/4 inch (1 cm). (Keep turning the dough as you roll, making sure the dough does not stick to the counter.) Cut out desired shapes using a lightly floured cookie cutter and transfer cookies to the prepared baking sheet. Place the baking sheets with the unbaked cookies in the refrigerator for 10 to 15 minutes to chill the dough which prevents the cookies from spreading and losing their shape while baking.
    Note: If you are not going to frost the baked cookies, you may want to sprinkle the unbaked cookies with crystal or sparkling sugar.
  5. Bake cookies for about 8-10 minutes (depending on size) or until the edges are just starting to brown. Remove from oven and let cookies cool on baking sheet for a few minutes before transferring to a wire rack to finish cooling. Frost with royal icing, if desired. Be sure to let the royal icing dry completely before storing. (This may take several hours.)
  6. Frosted cookies will keep several days in an airtight container. Store between layers of parchment paper or wax paper.
  7. Makes about 36 - 4 inch (10 cm) cookies.


For Royal Icing:

  1. In the bowl of your electric mixer (or with a hand mixer), beat the confectioners' sugar and meringue powder until combined. 
  2. Add the water and beat on medium to high speed until very glossy and stiff peaks form (5 to 7 minutes). If necessary, to get the right consistency, add more powdered sugar or water. 
  3. To cover or 'flood' the entire surface of the cookie with icing, the proper consistency is when you lift the beater, the ribbon of icing that falls back into the bowl remains on the surface of the icing for a few seconds before disappearing.

The icing needs to be used immediately or transferred to an airtight container as royal icing hardens when exposed to air. Cover with plastic wrap when not in use.

Thursday, October 28

Cupcake and fondant decoration .2

Here are a few more pictures from the workshop I did the other day.
I love the mushrooms, I will be making these more often!


I thought I had a lot more pictures about how I made these mushrooms! Sadly they weren't as I thought they would be, but I guess it gives beginners like me an idea about how to make them. Or I hope so! But they are cute anyways, right?

The white parts are made with fondant, an the red and green are made with marzipan, yumyum!


First we rolled out the marzipan and cut out a circle the exact size of the cupcake.

(sorry for the blurry picture) Next you make two balls with white fondant, then press your thumb and indexfinger on two sides of the ball. Next you start rolling the ball between your fingers. If you do it correctly it will look like the picture. You can make one side thinner than the other.


 Then with red marzipan you make two red balls. Then you press your thumb in it and fold the marzipan over your thumb, like a little cap. Then with a little white piece you make the lower part of the mushroom cap, by filling it with white fondant. The lower part can be flat, or hollow.


Next put the cap on the stump and put little white dots on them, and voila!


The grass is made with a garlic press. Just make a ball and press it through the holes, then slowly take it off the press with a toothpick and put it on the cupcake.

Note: everything is glued together with pipingel, mixed with just a little bit of water. You can put it on a plate and use it with a little brush (like in the pictures)

Friday, October 22

Cupcakes and fondant decoration .1


Today I went to a cupcake (fondant) decoration workshop with a friend. The workshop was organised by pipoos, a craft and hobby shop here in Holland. Recently they have started selling baking decoration supplies, with brands like Wiltons (which is still pretty rare here) and other brands. So this time in their hobby workshop week they did a cupcake decoration theme, with fondant.
We had so much fun! We subscribed for one hour, but stayed an hour extra because it was so much fun! And it was 3 euro's per hour anyway.

The cupcakes were already baked the day before, and we were allowed to do anything we wanted with them. They had several colors of fondant, embossers, cutters and icing. They also had several examples which we could copy, and they would show us the steps we had to take.


These were a few examples, I love those mushrooms!
First we started rolling the fondant and cut out circles which were slightly bigger than the cupcake itself. It gave a nice effect this way.


I decided to make a little tower with one normal cupcake, and one tiny cupcake. So cute!


I cut out little flowers with embossers, and one big flower for the tiny cupcake. Then decorated them with white balls and some leafs. Aahhw!


Next I made a pink cupcake (I just had to use more of that pink fondant). This time I did the same as before, and made the fondant slightly bigger than the cupcake.


Cute, right?

I will post some more pictures soon, I made those mushrooms and I really have to show them!

I had to use a high ISO with my camera to make these pictures come out clear and sharp. Unfortunately the sensor in my camera isn't so good as I'd want it to be, so most of these pictures have noise in them (besides the top picture, which I made in my lightbox I recently made). Oh well, better next time!

Sunday, October 10

Chocolate chip cookies


These are the best chocolate chip cookies ever! The edges of these cookies get a little crunchy and golden, and the middle stays quite chewy but hard.
The original recipe is only uses semisweet chocolate chips, but I made half white chocolate and half semisweet.


170gr (3/4 cup) unsalted butter, melted
220gr (1 cup) packed brown sugar
100gr (1/2 cup) white sugar
220gr (2 cups) all-purpose flour
1 egg
1 egg yolk
1/2 teaspoon baking soda
1/2 teaspoon salt
1 tablespoon vanilla extract
150gr (1 cup) semisweet chocolate chips
150gr (1 cup) white chocolate chips
  1. Sift together the flour, baking soda and salt; set aside.
  2. In a medium bowl, cream together the melted butter, brown sugar and white sugar until well blended. Beat in the vanilla, egg, and egg yolk until light and creamy. Mix in the sifted ingredients until just blended. Stir in the chocolate chips by hand using a wooden spoon.
  3. Refrigerate the dough for at least an hour. When it's time, Preheat the oven to 325 degrees F (165 degrees C). (Sometimes when I'm lazy I just chill them for about 15 minutes in the freezer)
  4. Drop cookie dough 1/4 cup at a time onto the prepared cookie sheets. Cookies should be about 3 inches apart.
  5. Bake for 15 to 17 minutes in the preheated oven, or until the edges are lightly toasted. Cool on baking sheets for a few minutes before transferring to wire racks to cool completely.

Adapted from Lovin' From the Oven

Friday, October 1

Harmony Coffee


At school I usually drink ''Harmony Coffee'', which basically is a cappuccino with white chocolate. They rasp white chocolate bars and dissolve it with the milk. I love it so much I decided to make it myself.


  • Your coffee (either a latte, cappuccino or even black)
  • 3 teaspoon white chocolate (or to taste)
  1. When you are making your coffee, rasp your white chocolate or melt it au bain marie style. I prefer to rasp it since that dissolves better, and when melting white chocolate it usually get's hard again and you get chunks in your coffee. Or use melting chocolate.
  2. If you are making a latte, add the white chocolate when the milk is at it's highest temperature. When you are making black coffee, add it as soon as possible.
  3. Serve your coffee!

Delicious in a big mug in front of the telly on a rainy day.
The mug is from Blond Amsterdam

Thursday, September 16

Strawberry white chocolate cheesecake


Although cheesecake is getting populair in the Netherlands it is not common to eat it, or bake it. We do have a similair pie called 'kwark taart', but that is not at all tasty like the american cheesecake.

Since I was curious about the cheesecake I decided to bake it and choose the most simple recipe I could find. I love it! But I don't know if it is the traditional way of making cheesecake, but it's only a first attempt anyway...
I added white chocolate because I just love that with everything, and ofcourse strawberries to give it a sweet fresh extra. 


  • 150g Bastogne cookies or graham crackers, crushed
  •  50g butter, soft
  •  400g creamcheese
  •  100g Sugar
  •  2 eggs
  •  150g white chocolate, crushed
  •  20g white chocolate chips for topping
  •  Strawberries for topping 
  1. Preheat oven at 175C. Crush the cookies or crackers and mix it with the butter. Press it into a greased and lined pan, make sure it is spread well.
  2. Crush the chocolate into pieces, I used chocolate chips from Nestle and crushed those. You can also choose to melt the chocolate, then I recommend not using chips because they usually don't melt that fast.
  3. Mix the creamcheese with the sugar, white chocolate and eggs, then spread it over the cookiemix.
  4. Bake the cheesecake in the oven for about 40 min. Let it cool down.


    Bastogne cookies are cookies from Holland I think. I do not know if they sell it out of Europe, any other cookie made out of mostly brown sugar works great as well. Or just graham crackers ofcourse.


    Note that I used a quite small pan to bake this cheesecake in, I recommend adding half of these ingredients if you are using a 26cm pan.