Thursday, October 28

Cupcake and fondant decoration .2

Here are a few more pictures from the workshop I did the other day.
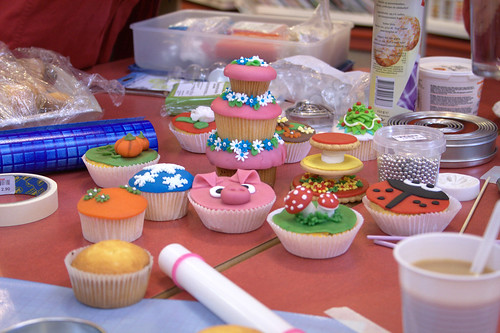
I love the mushrooms, I will be making these more often!


I thought I had a lot more pictures about how I made these mushrooms! Sadly they weren't as I thought they would be, but I guess it gives beginners like me an idea about how to make them. Or I hope so! But they are cute anyways, right?

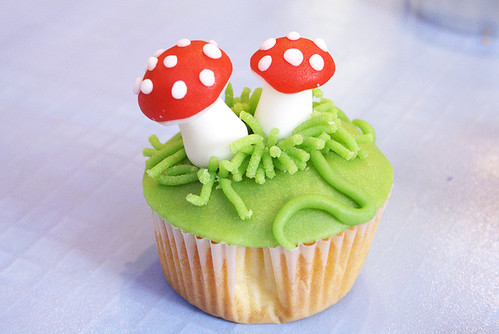
The white parts are made with fondant, an the red and green are made with marzipan, yumyum!


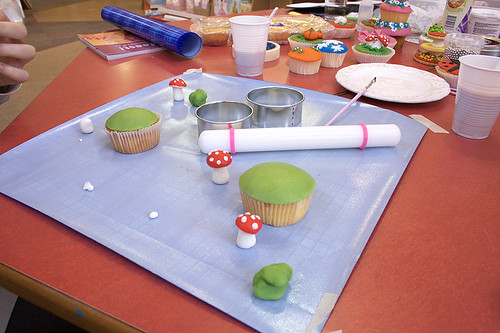
First we rolled out the marzipan and cut out a circle the exact size of the cupcake.

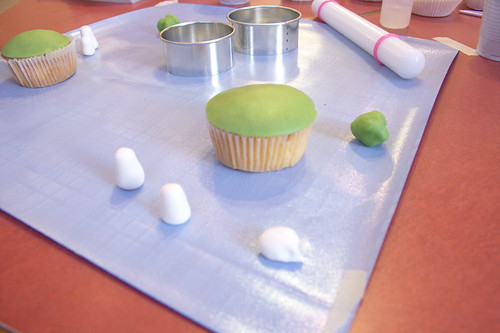
(sorry for the blurry picture) Next you make two balls with white fondant, then press your thumb and indexfinger on two sides of the ball. Next you start rolling the ball between your fingers. If you do it correctly it will look like the picture. You can make one side thinner than the other.


 Then with red marzipan you make two red balls. Then you press your thumb in it and fold the marzipan over your thumb, like a little cap. Then with a little white piece you make the lower part of the mushroom cap, by filling it with white fondant. The lower part can be flat, or hollow.


Next put the cap on the stump and put little white dots on them, and voila!


The grass is made with a garlic press. Just make a ball and press it through the holes, then slowly take it off the press with a toothpick and put it on the cupcake.

Note: everything is glued together with pipingel, mixed with just a little bit of water. You can put it on a plate and use it with a little brush (like in the pictures)

Friday, October 22

Cupcakes and fondant decoration .1


Today I went to a cupcake (fondant) decoration workshop with a friend. The workshop was organised by pipoos, a craft and hobby shop here in Holland. Recently they have started selling baking decoration supplies, with brands like Wiltons (which is still pretty rare here) and other brands. So this time in their hobby workshop week they did a cupcake decoration theme, with fondant.
We had so much fun! We subscribed for one hour, but stayed an hour extra because it was so much fun! And it was 3 euro's per hour anyway.

The cupcakes were already baked the day before, and we were allowed to do anything we wanted with them. They had several colors of fondant, embossers, cutters and icing. They also had several examples which we could copy, and they would show us the steps we had to take.


These were a few examples, I love those mushrooms!
First we started rolling the fondant and cut out circles which were slightly bigger than the cupcake itself. It gave a nice effect this way.


I decided to make a little tower with one normal cupcake, and one tiny cupcake. So cute!


I cut out little flowers with embossers, and one big flower for the tiny cupcake. Then decorated them with white balls and some leafs. Aahhw!


Next I made a pink cupcake (I just had to use more of that pink fondant). This time I did the same as before, and made the fondant slightly bigger than the cupcake.


Cute, right?

I will post some more pictures soon, I made those mushrooms and I really have to show them!

I had to use a high ISO with my camera to make these pictures come out clear and sharp. Unfortunately the sensor in my camera isn't so good as I'd want it to be, so most of these pictures have noise in them (besides the top picture, which I made in my lightbox I recently made). Oh well, better next time!

Sunday, October 10

Chocolate chip cookies


These are the best chocolate chip cookies ever! The edges of these cookies get a little crunchy and golden, and the middle stays quite chewy but hard.
The original recipe is only uses semisweet chocolate chips, but I made half white chocolate and half semisweet.


170gr (3/4 cup) unsalted butter, melted
220gr (1 cup) packed brown sugar
100gr (1/2 cup) white sugar
220gr (2 cups) all-purpose flour
1 egg
1 egg yolk
1/2 teaspoon baking soda
1/2 teaspoon salt
1 tablespoon vanilla extract
150gr (1 cup) semisweet chocolate chips
150gr (1 cup) white chocolate chips
  1. Sift together the flour, baking soda and salt; set aside.
  2. In a medium bowl, cream together the melted butter, brown sugar and white sugar until well blended. Beat in the vanilla, egg, and egg yolk until light and creamy. Mix in the sifted ingredients until just blended. Stir in the chocolate chips by hand using a wooden spoon.
  3. Refrigerate the dough for at least an hour. When it's time, Preheat the oven to 325 degrees F (165 degrees C). (Sometimes when I'm lazy I just chill them for about 15 minutes in the freezer)
  4. Drop cookie dough 1/4 cup at a time onto the prepared cookie sheets. Cookies should be about 3 inches apart.
  5. Bake for 15 to 17 minutes in the preheated oven, or until the edges are lightly toasted. Cool on baking sheets for a few minutes before transferring to wire racks to cool completely.

Adapted from Lovin' From the Oven

Friday, October 1

Harmony Coffee


At school I usually drink ''Harmony Coffee'', which basically is a cappuccino with white chocolate. They rasp white chocolate bars and dissolve it with the milk. I love it so much I decided to make it myself.


  • Your coffee (either a latte, cappuccino or even black)
  • 3 teaspoon white chocolate (or to taste)
  1. When you are making your coffee, rasp your white chocolate or melt it au bain marie style. I prefer to rasp it since that dissolves better, and when melting white chocolate it usually get's hard again and you get chunks in your coffee. Or use melting chocolate.
  2. If you are making a latte, add the white chocolate when the milk is at it's highest temperature. When you are making black coffee, add it as soon as possible.
  3. Serve your coffee!

Delicious in a big mug in front of the telly on a rainy day.
The mug is from Blond Amsterdam